What to Expect During a Professional Chimney Flashing Repair in Shavano Park
Chimney flashing leaks create immediate problems for Shavano Park homeowners. Water stains on ceilings near your fireplace signal flashing failure. You hear dripping sounds inside the chimney chase. Rust appears on your damper or smoke shelf. These symptoms demand prompt professional attention before structural damage spreads through your roof system.
Why Chimney Flashing Fails in Shavano Park
Shavano Park’s climate creates unique challenges for chimney flashing. Summer heat exceeds 100 degrees Fahrenheit. UV radiation degrades rubber sealants and aluminum flashing. Sudden thunderstorms dump inches of rain in hours. Clay soils beneath your foundation shift with moisture changes. These factors combine to stress the roof-to-chimney connection.
Most flashing failures start at the mortar joints where chimney meets roof. Expansion and contraction from temperature swings creates tiny gaps. Water seeps through these gaps during heavy rains. Freeze-thaw cycles in winter widen these openings. Poor initial installation compounds these problems over time.
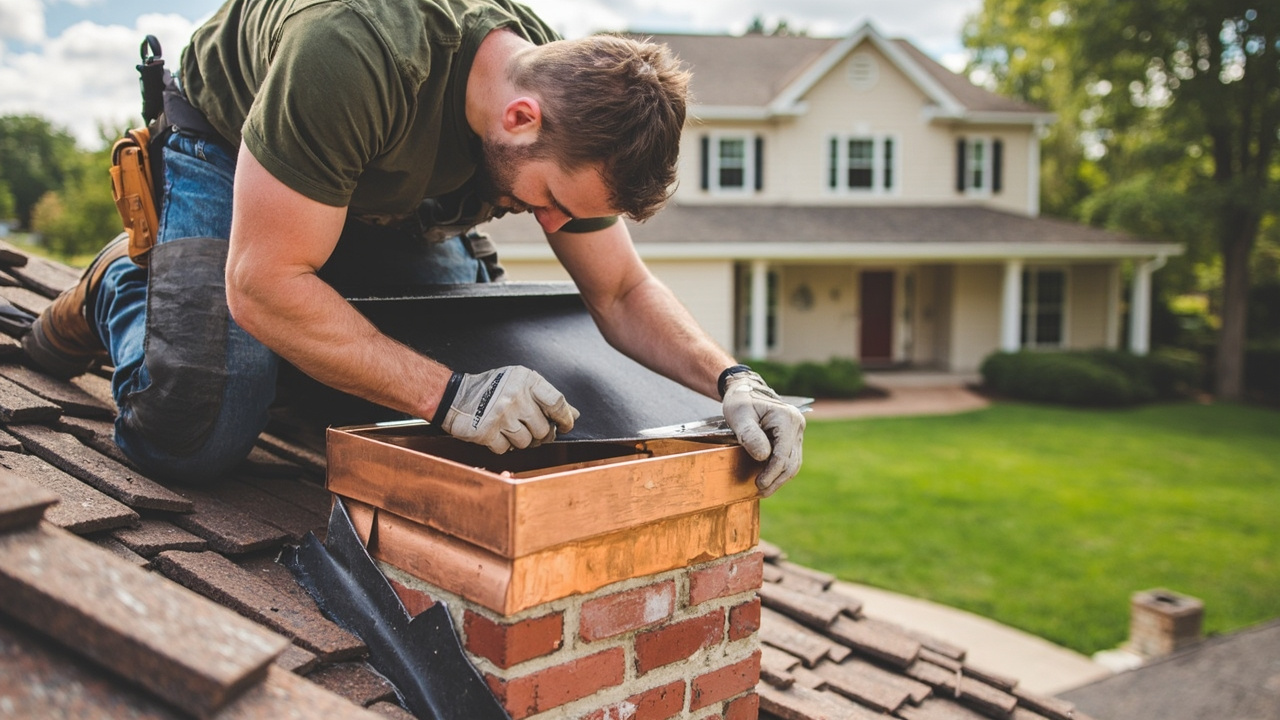
Types of Chimney Flashing Components
Professional chimney flashing repair involves multiple components working together. Step flashing consists of L-shaped metal pieces that overlap roof shingles. Each piece extends up the chimney face and under the shingle above. Counter flashing embeds into the chimney mortar joints and folds over the step flashing. This creates a water-shedding system. EPA moisture control guide.
Chimney crickets or saddles divert water around wide chimneys. These metal structures prevent water pooling behind chimneys wider than 30 inches. Without a cricket, water backs up and finds entry points through flashing gaps.
Base flashing provides the first line of defense. This continuous metal strip seals the bottom edge where chimney meets roof deck. Apron flashing covers the front face of the chimney where water flows downward.
Professional Inspection Process
Roofing professionals start with a thorough inspection. They examine both interior and exterior chimney conditions. Inside your attic they look for water stains on rafters and roof sheathing. They check for daylight visible through flashing gaps. Outside they assess flashing condition, mortar joint integrity, and chimney crown status. Built-Up Roofing (BUR).
Technicians measure chimney dimensions and roof pitch. They document existing flashing materials and installation methods. This information determines whether repair or replacement makes more sense. Simple flashing replacement costs less than complete chimney rebuilding. How much a new roof actually costs in San Antonio right now.
Water testing helps locate exact leak sources. Technicians spray water on specific areas while monitoring interior moisture. This eliminates guesswork and prevents unnecessary repairs. They also check for related issues like damaged shingles or improper attic ventilation.
Repair vs. Replacement Decision
Age determines repair approach. Flashing under ten years old often repairs well. Older flashing usually needs complete replacement. Metal fatigue shows as cracking, splitting, or severe corrosion. These conditions prevent reliable repairs.. Read more about Why your Olmos Park estate needs custom copper flashing to prevent leaks.
Chimney condition affects repair options. Sound masonry accepts new flashing installation. Crumbling mortar requires tuck-pointing before flashing work begins. Large cracks in chimney structure need masonry repair first.
Roof age influences decisions. New roofs with flashing problems need targeted repairs. Older roofs approaching replacement age might benefit from complete flashing replacement during upcoming roof work.
Step-by-Step Repair Process
Professional chimney flashing repair follows systematic steps. First technicians protect surrounding areas with drop cloths and roof brackets. They remove old flashing carefully to avoid damaging shingles or chimney. This reveals underlying roof deck condition.
Next they install ice and water shield around chimney base. This self-adhering membrane creates waterproof barrier extending several feet up chimney sides. It seals around nails and provides secondary protection if flashing fails.
Step flashing installation begins at bottom. Each piece overlaps previous one by at least two inches. Flashing extends up chimney face at least four inches. Installers weave flashing with shingle courses for complete integration.
Counter flashing installation follows. Technicians cut grooves into chimney mortar joints using specialized tools. They bend counter flashing to fit these grooves precisely. This creates mechanical bond stronger than surface adhesives.
Sealant application finishes the job. High-quality polyurethane sealant fills gaps around flashing edges. This flexible material accommodates movement without cracking. Technicians avoid silicone sealants which deteriorate under UV exposure.
Material Selection for Shavano Park
Material choice affects repair longevity. Galvanized steel offers economy but corrodes within 15-20 years. Aluminum resists corrosion but lacks strength for step flashing. Copper provides lifetime durability but costs significantly more.
Stainless steel combines strength with corrosion resistance. Type 304 stainless works well in most applications. Type 316 offers superior salt air resistance for homes near military bases or industrial areas.
Lead-coated copper provides traditional appearance with modern durability. This material develops protective patina over time. It remains flexible enough to accommodate chimney movement without cracking.
Flashing thickness matters. Sixteen-gauge metal withstands foot traffic during future roof work. Thinner gauges save money but dent easily. Professional installers match thickness to expected service conditions.
Cost Factors in Shavano Park
Chimney flashing repair costs vary based on several factors. Chimney height affects labor time. Steep roof pitches increase safety requirements and equipment needs. Multiple chimneys on one property reduce per-unit costs through efficiency.
Material selection drives price differences. Basic galvanized flashing costs less than copper or stainless steel. Custom-fabricated flashing for unusual chimney shapes adds labor time. Historic home requirements may mandate specific materials or installation methods.
Accessibility impacts pricing. Single-story homes with ground-level chimneys cost less to service than two-story homes requiring roof ladders or scaffolding. Roof complexity around chimney affects installation time.
Emergency repairs command premium rates. Weekend or holiday service adds 25-50% to standard rates. Weather-related demand spikes also increase prices temporarily. Emergency Roof Leak Detection.
Common Shavano Park Home Styles
Shavano Park features diverse architectural styles affecting flashing repair. Mediterranean homes often feature clay tile roofs with stucco chimneys. These require careful flashing integration to prevent tile damage.
Traditional brick ranch homes have simpler flashing needs. Standard asphalt shingles and brick chimneys follow conventional flashing patterns. Wood siding homes may have different chimney interfaces requiring specialized approaches.
Modern homes sometimes feature metal or synthetic siding with prefabricated chimneys. These systems often include integrated flashing components. Repair requires manufacturer-specific knowledge and parts.
Hillside properties in Shavano Park present unique challenges. Roof slopes may vary around chimneys. Drainage patterns require careful consideration during flashing design.
Quality Assurance and Warranty
Professional flashing repair includes quality verification steps. Technicians inspect all work before cleanup. They verify proper overlap, sealant coverage, and mechanical fastening. Water testing confirms leak elimination.
Warranty coverage varies by contractor and material. Standard workmanship warranties cover one to five years. Material warranties depend on flashing type selected. Copper flashing may carry lifetime material warranties. Understanding Roof Warranties.
Documentation provides protection. Professional invoices detail materials used, installation methods, and warranty terms. Photos document existing conditions and completed work. This information helps with future maintenance or insurance claims.
Follow-up inspections ensure long-term success. Many contractors offer one-year check-ups to verify flashing performance. This catches minor issues before they become major problems.
Maintenance Recommendations
Regular maintenance extends flashing life. Annual visual inspections identify early problems. Look for cracked sealant, rusted flashing, or separated joints. Address issues promptly to prevent water damage.
Gutter cleaning prevents water backup around chimneys. Clogged gutters cause water to overflow onto roof edges. This increases moisture exposure to flashing systems.
Tree trimming reduces debris accumulation on roofs. Leaves and twigs trap moisture against flashing. This accelerates corrosion and sealant deterioration.
Professional cleaning removes algae and moss growth. These organisms retain moisture against metal surfaces. They also create root systems that penetrate flashing joints over time.
Attic ventilation affects flashing longevity. Poor ventilation creates moisture buildup that condenses on cold chimney surfaces. This moisture promotes flashing corrosion from inside out.
Choosing the Right Contractor
Chimney flashing repair requires specialized skills. Not all roofers have chimney experience. Look for contractors with specific chimney flashing expertise and local references.
Verify licensing and insurance. Texas requires roofing contractors to carry general liability and workers’ compensation insurance. Ask for current certificates before work begins.
Check local experience. Shavano Park has specific building requirements and weather patterns. Contractors familiar with local conditions provide better results.
Request detailed proposals. Written estimates should specify materials, methods, and warranty terms. Avoid contractors who refuse written documentation or demand large upfront payments.
Compare multiple bids but don’t choose based on price alone. Quality workmanship prevents costly callbacks. The cheapest option often costs more long-term through repeated repairs.
Emergency Repair Situations
Active leaks require immediate attention. Water entering your home damages ceilings, walls, and personal property. Mold growth begins within 24-48 hours of water exposure.
Temporary repairs provide immediate protection. Emergency tarping prevents further water entry while permanent repairs schedule. This buys time for proper material procurement and weather planning.
Storm damage often affects multiple roof areas. Professional assessment identifies all damage sources. Fixing only visible problems leaves hidden issues that cause future leaks.
Insurance claims require documentation. Professional contractors provide detailed damage assessments and repair estimates. This information supports insurance adjuster evaluations.
Safety considerations affect emergency response. Wet roofs create slip hazards. Steep pitches require specialized equipment. Professional crews have proper safety gear and training.
Long-Term Value Considerations
Quality flashing repair protects your home investment. Water damage repairs cost far more than preventive flashing maintenance. Early intervention prevents structural damage to roof decking and ceiling joists.
Energy efficiency improves with proper flashing. Air leaks around chimneys increase heating and cooling costs. Sealed flashing systems reduce these losses.
Home resale value benefits from documented repairs. Buyers appreciate knowing roof systems function properly. Professional repair documentation provides confidence during real estate transactions.
Insurance premiums may decrease with preventive maintenance. Some insurers offer discounts for documented roof maintenance. This offsets repair costs over time.
Peace of mind has real value. Knowing your home stays dry during heavy rains eliminates stress. Quality repairs provide reliable protection for years.
Environmental Considerations
Material choices affect environmental impact. Recycled metal flashing reduces resource consumption. Long-lasting materials decrease replacement frequency and landfill waste.
Proper installation prevents water pollution. Flashing failures allow pollutants to enter storm drains. Clean water runoff benefits local ecosystems.
Energy conservation matters. Quality flashing reduces heating and cooling energy use. This lowers carbon emissions from power generation.
Local material sourcing reduces transportation emissions. Some contractors maintain relationships with local metal suppliers. This supports regional economies while reducing environmental impact.
Sustainable practices extend beyond materials. Professional contractors recycle old flashing and minimize jobsite waste. These practices reduce environmental footprint.
Future Technology Integration
Smart home technology creates new flashing considerations. Solar panel installations require flashing integration. Electric vehicle charging stations need weatherproof roof penetrations.
Roof-mounted equipment increases flashing complexity. Satellite dishes, HVAC units, and security cameras all require proper sealing. Future planning accommodates these additions.
Building codes evolve with technology. New requirements may affect flashing installation methods. Professional contractors stay current with code changes.
Material science advances improve flashing performance. New coatings resist corrosion better than traditional galvanization. Self-healing sealants automatically repair minor damage.
Climate change affects design considerations. More frequent extreme weather events require robust flashing systems. Professional contractors adapt designs for changing conditions.
Frequently Asked Questions
How long does chimney flashing repair take?
Most chimney flashing repairs complete in one day. Simple repairs take 4-6 hours. Complex jobs requiring masonry work may need two days. Weather conditions can extend timelines.
Can I repair chimney flashing myself?
DIY flashing repair risks water damage and personal injury. Professional tools and techniques ensure proper installation. Warranty coverage requires professional workmanship. Safety concerns make professional service advisable.
How often should chimney flashing be inspected?
Annual inspections identify problems early. Check flashing after severe storms. Look for visible damage during routine roof maintenance. Professional inspections every two years provide comprehensive assessment.
What causes chimney flashing to fail?
UV radiation degrades sealants. Temperature changes cause metal fatigue. Poor installation creates failure points. Foundation movement stresses flashing joints. Age naturally reduces material effectiveness.
How much does chimney flashing repair cost?
Repair costs range from $300 to $1,500 depending on damage extent and materials. Simple flashing replacement costs less than complete chimney rebuilding. Emergency repairs command premium rates. For more information, visit FEMA Texas hail damage report.